Today we have a special treat for all of you faithful readers: a guest blogger! We are so excited to share our blog with a fellow blogger, DIYer, and friend.
Our friend Margeaux is a solidly talented individual who brims with creativity. Margeaux got married to her husband, Jordan, eight months ago and it has been so fun to see (even from afar) their adventures together and how they are settling into their home. Based out of Hudsonville, MI, Margeaux works during the day at Grabber Inc. in sales and marketing and when she gets home she lets her creativity shine and works on projects for her Etsy store, so perfectly named,
This Nifty Earth (she is also listed under our favorites tab if you want to look her up later)!
Today Margeaux is going to share her bookshelves with you. They caught my eye in a recent
post of hers (scroll almost to the bottom to see the full picture and start drooling!) and I had to ask if she would share them with all of you. SO, without further ado, Margeaux Cotton of This Nifty Earth!
-------------------------------------------------------------------------------------
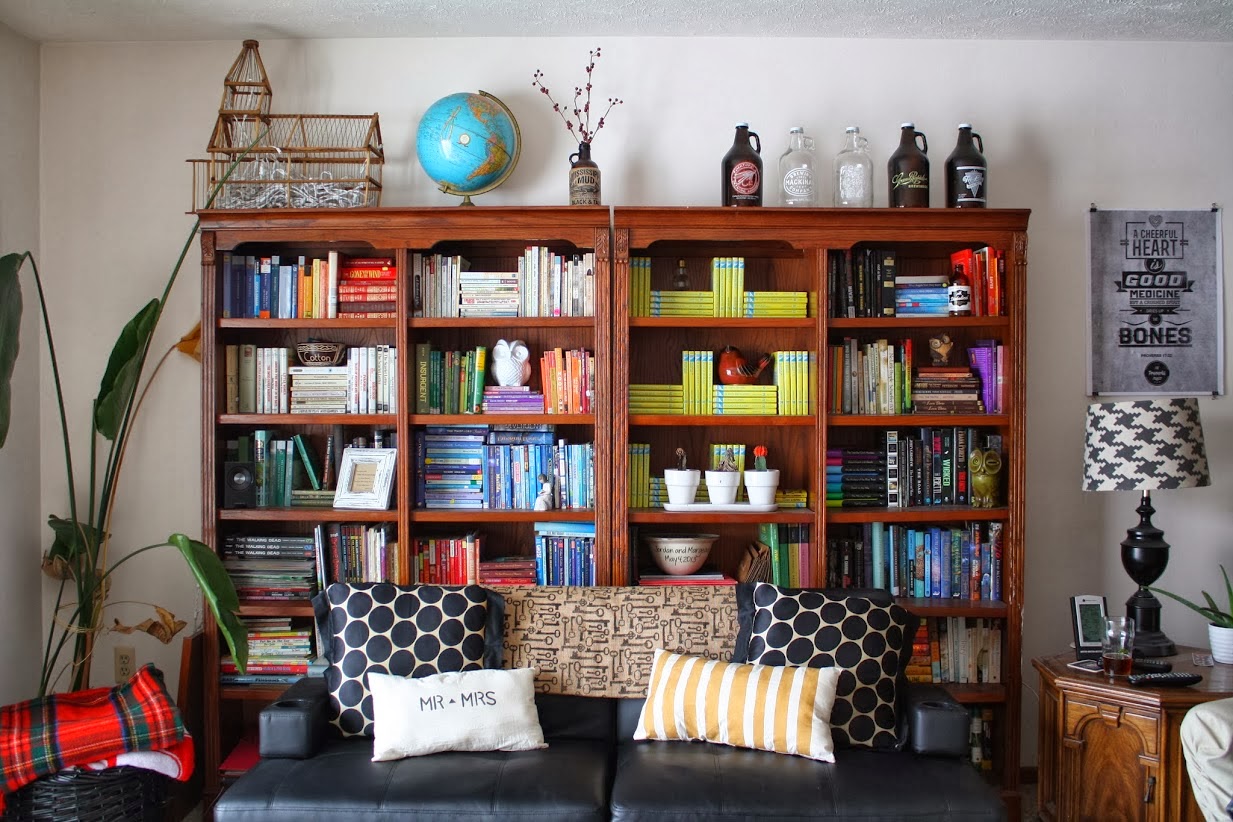
When Jordan and I got engaged, one of the gifts that my mother gave me was a pair of two massive wooden bookshelves. I was so excited I could hardly contain myself! Unfortunately though, when we got everything settled after the honeymoon, I realized I didn't like the way I had haphazardly thrown everything onto the shelves. There was no rhyme or reason and I knew that if I just left them the way they were, they were just going to look terrible. Since these shelves lived in the middle of our living room (the main area of our house) I really wanted them to add to the room, not take away.
I set out on a quest to find a way to make them more like art and less like a basic piece of furniture. During my searching I found
this article by Jenny of
Little Green Notebook. To say I fell in love wouldn't be accurate, in fact, I had the immediate urge to do my own styling following her simple steps: Separate by genre and then break it down even further by color.
I ended up with six categories:
- Comic Books
- Classics
- Youth Fiction
- Religion
- Adult Fiction
- Collections
We have several other genres such as education, art and non-fiction, but those are always by our coffee table or being looked at, so their home is on the lower shelves hidden by the sofa.
Once I had all of my books organized into genres and colors (which took me about four days doing it for an hour or two after work), I had to decide what "fillers" I wanted to add. These items were slowly "found" and placed over time. The arrangement we currently have is my favorite so far and has been around for several months. It is a mixture of wedding gifts, goodwill finds, and items that hold major memories for us.
I love owls. When I decided to start adding things to the shelves, I knew a couple of these cute feathery friends would definitely make their home there. The little brown owl was a gift from Jordan after a fishing trip from 2013, the white owl was a chipped silver mess that I cleaned up with a fresh coat of paint and the green one is a piggy bank that I snatched up at Goodwill!
A few of the things on our shelves made their way there for lack of anywhere else to go. I love all three of these things, but wasn't sure where I could put them that would make them stand out and feel as special as they are! The bookshelves were the perfect spot. The lightbulb is actually a bottle and was given to me by a dear friend. The ceramic bird is from Goodwill and I felt that it would fit perfectly in our living room. The beer bottle is local (something that Jordan and I love) and let's face it, it's just plain cute!
All three of these items were wedding gifts. The frame is from a family friend on my side and I cried when I received it. The hand-carved bowl is from a dear friend of Jordan's and holds our playing cards. The personalized bowl is a gift from our grandparents and every time I look at it, I smile.
These knick-knacks, once they made their way to the bookshelves, are what finally made everything look perfect to me.
I have also added some other things that I love to the top of the shelves: a wooden church birdhouse that is full of Christmas lights (from my mum), a globe (from my mum), a jug from a favorite beer that I thought looked cool and our growlers from locals breweries. Occasionally some flowers or plants also find their way up there too!
--------------------------------------------------------------------------------------
Talk about using what you have and what you LOVE to make a statement! Her use of knick-knacks brings the whole shelving unit together while adding some major interest. If you can see, she also has arranged her books, not only vertically but horizontally as well. This delineation of books adds "risers" to a bookshelf and can make those knick-knacks stand out (look at that white owl on top of the purple books)!
A BIG thank you to Margeaux for giving us a glimpse into her home and sharing her tricks on organizing and designing an awesome bookshelf!
If you have any questions for Margeaux, please comment and we will get them to her so she can answer!!
Do any of you have bookshelves that make you very proud? Did this post inspire you to change things up a bit at your house? Please send us pictures at rebhanrenovation@gmail.com and we will feature YOUR bookshelves/wall shelves in a follow up post!