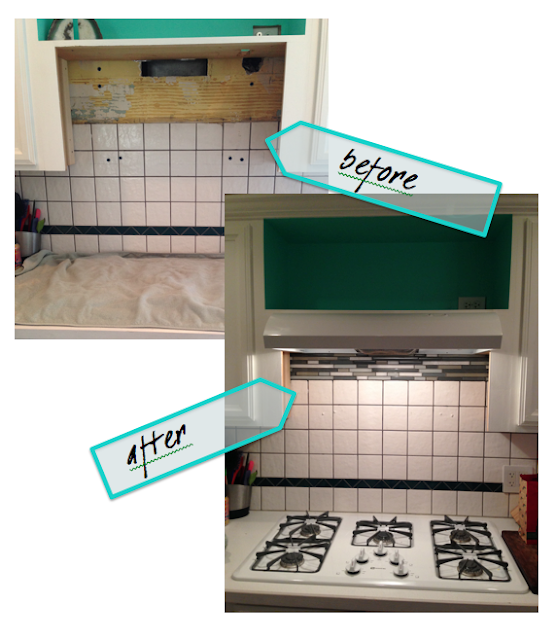
Well we finally finished some projects that have been waiting in the wings; the end to two projects that honestly could have been finished weeks ago but it has been hard to get our butts in gear to finish.
BUT WE FINALLY DID IT.
As you know, we put a walkway into an existing wall to create a dining room out of a bedroom right when we moved in. Doing this required us to take the baseboard moulding off the wall and well, it was never replaced. So now, almost two and a half months later, we replaced it. It's amazing how moulding can change a room (both living and dining room) and make it look complete! Project #1 COMPLETE!
The other project was completing the kitchen. We had replaced our cooktop and taken down the microwave which left an ugly un-tiled background for everyone to look at (for about a month and a half).
We looked around for tile to match the existing white but it's not just simple white tile, it's actually dimpled (you can tell in the picture above wherever the light hits the tile). This proved to be difficult to match, therefore, we just decided to get something that would "go" - it's ok in fashion, why not in your kitchen?
Since the space that needed to be covered was only about 34 inches by 6 inches we decided on a preset pattern that would match the existing tiles. The dark tile line of tile (as seen in photo above) is a forest-y green so we had to go with that family. We ended up with this seafoam, forest green, white and charcoal tile pattern.
We split each square into halves (6 inches high) and applied liquid nails to each individual tile (through the mesh on the back.
We had to snap some of the tiles to make it fit better behind the cabinets: pliers and muscles were all it took to get the smaller tiles to break. Thankfully the breaks didn't have to be clean because they were only on the ends and were getting tucked away!
Once everything fit properly, I was able to just start putting the tile up. We only ended up needing three sections, this was definitely an easy tile job.
We had to add some random tiles and foam insulation so that the hood would seal properly. We didn't bother to grout these tiles since they would A) never be seen and B) were merely being used as placeholders.
After the tile was up and we let the adhesive set properly we mixed the grout and started sealing. We used grey grout since the existing tile was grouted in grey and we wanted to match as much as we could. We didn't even get close to using the half a bag (7lb bag) that we mixed even with the bathroom touch ups that we did - next time we'll know!
After about half an hour Rob sponged down the area to diminish any residue where there shouldn't be any. Once the wall was done it was all about the hood and therefore, I was tagged out of the renovation game - Rob and my Dad rewired, reinstalled and (thankfully) didn't even get electrocuted! ha!
The final step was to caulk around the new hood so that people - taller than myself - couldn't see the seam between the hood and the surrounding cabinet.
The final step was to caulk around the new hood so that people - taller than myself - couldn't see the seam between the hood and the surrounding cabinet.
In the end the tiling project ended up costing only about $30 and the only took about an hour (including waiting time)! I wouldn't call myself a pro or anything but it made me feel more comfortable for any future tiling endeavors! The guys might say that they will leave the electricity to the professionals from now on, but I think they did a great job!
VOILA!
Many thanks to Dad Brand for helping us with all our little projects!
p.s. the four dark dots on the tile in the "before" picture above were large sinkers and needed to be removed, leaving four large holes in the tile. I just added some caulk - as you can see in the after picture - and I am just waiting for it to completely set before removing the access! No more gaping holes in the nice tile! yay!
until next time, Lindsey


This was a great solution! Definitely better than an imperfect match
ReplyDelete