Wednesday, January 29, 2014

hiding the chaos

We are finally breaking into the basement domain. To be completely honest with you, it's not an exciting space right now and we haven't even broken into what we would really call "phase one" of the basement renovation. We have made some small changes to make it feel more livable and organized. We aren't going to show you the whole basement today, just my desk area and craft storage area, that's where all the DIY magic happens anyway!

When we moved in we were thrilled about all the existing built in storage in the basement. The shelves in the finished part of the basement (seen below) make for such a nice space to keep all my craft and DIY items together in once place. In our last apartment we had to use multiple pieces of furniture to keep all these items organized and now I can see it all in one "swoop"!


This is the chaos that we have been looking at for months. It's all organized and I know where everything is, but it just looks like a hot mess. Our idea has been to hang curtains over the shelves to alleviate the immediate headache these messy shelves create but we wanted to re-use and not buy new. Due to the "reuse it" mindset we have, we had to wait until we moved things around up stairs until they were settled so we could see what there was left over. We ended up using curtain rods and curtains that came with the house. 


Rob installed the curtain rods for me while I put the curtains in the wash. They cleaned up quite nicely seeing as though (I believe) they have never been washed. 


As you can see, they are not "wrinkle-free" and they were much to long for the job we needed them to do, as well as unfinished/un-hemmed. I thought about what solution I wanted to use for about a day before just making up my mind and hemming them with the old sewing machine. I was going to hem them in such a way that they could be let down later but considering they were free and not a great quality curtain, I just decided to hem and cut. 

*Oswin was very concentrated on the noise the sewing machine makes. She is just too cute! 


I achieved an even hem by measuring down both side of the curtain and folding the hem to the same length. I went through doubled fabric for about two feet of hem (I didn't cut the excess off because I wanted the weight of the double hem on the bottom). I sewed the line up the full length of the curtain to add continuity since I didn't have any white thread on hand (I know, I know, what kind of seamstress am I?).

Once I had completed both sides of each curtain, I ironed the bottom to a crisp line in order to get a nice, even hem on the bottom. 


As you can see in the picture on the left, I was left with a pocket at the bottom of the curtain and I didn't like the way it pulled the sides in when it was hung so I cut the pocket out. The double hem still leaves plenty weight to keep the curtain down but keeps it from pulling in from the sides. 


The hem and a quick iron (can you believe it since they are still so wrinkly!) made the difference for these basement storage shelves. 


This is my whole desk area, the table folds down on both sides and we usually keep the right "flap" folded down but it's awesome to have the extended space for working on projects! The shelving unit to the left is from Ikea and just adds nice "quick access" for the things I use the most. The greenish yellow storage cubes are respectively filled with yarn, fabric, and desk items such as notecards, writing utensils and all the other odds and ends.

Like I said, the basement is far from finished and we are moving s.l.o.w.l.y down here because we want to make some major changes (ie. drywall, new stairs, etc). We are happy to make these types of simple changes in order to make the space livable in the time being. 

Did any of you take on project of this caliber this weekend? Nothing too crazy hard to accomplish but makes a big difference?


Tuesday, January 28, 2014

Guest Blogger: Margeaux of This Nifty Earth

Today we have a special treat for all of you faithful readers: a guest blogger! We are so excited to share our blog with a fellow blogger, DIYer, and friend. 

Our friend Margeaux is a solidly talented individual who brims with creativity. Margeaux got married to her husband, Jordan, eight months ago and it has been so fun to see (even from afar) their adventures together and how they are settling into their home. Based out of Hudsonville, MI, Margeaux works during the day at Grabber Inc. in sales and marketing and when she gets home she lets her creativity shine and works on projects for her Etsy store, so perfectly named, This Nifty Earth (she is also listed under our favorites tab if you want to look her up later)! 

Today Margeaux is going to share her bookshelves with you. They caught my eye in a recent post of hers (scroll almost to the bottom to see the full picture and start drooling!) and I had to ask if she would share them with all of you. SO, without further ado, Margeaux Cotton of This Nifty Earth!

-------------------------------------------------------------------------------------

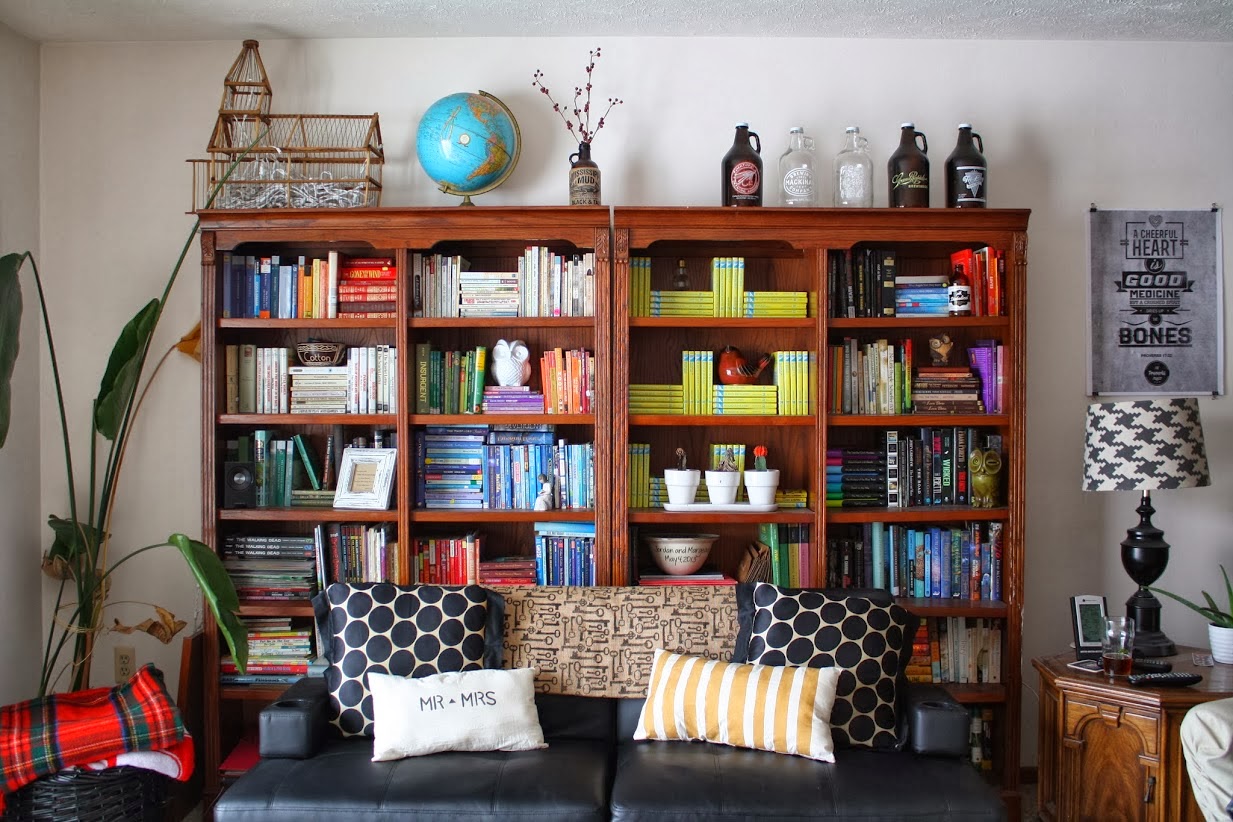
When Jordan and I got engaged, one of the gifts that my mother gave me was a pair of two massive wooden bookshelves. I was so excited I could hardly contain myself! Unfortunately though, when we got everything settled after the honeymoon, I realized I didn't like the way I had haphazardly thrown everything onto the shelves. There was no rhyme or reason and I knew that if I just left them the way they were, they were just going to look terrible. Since these shelves lived in the middle of our living room (the main area of our house) I really wanted them to add to the room, not take away. 

I set out on a quest to find a way to make them more like art and less like a basic piece of furniture. During my searching I found this article by Jenny of Little Green Notebook. To say I fell in love wouldn't be accurate, in fact, I had the immediate urge to do my own styling following her simple steps: Separate by genre and then break it down even further by color. 

I ended up with six categories:
  • Comic Books
  • Classics
  • Youth Fiction
  • Religion
  • Adult Fiction
  • Collections

We have several other genres such as education, art and non-fiction, but those are always by our coffee table or being looked at, so their home is on the lower shelves hidden by the sofa. 

Once I had all of my books organized into genres and colors (which took me about four days doing it for an hour or two after work), I had to decide what "fillers" I wanted to add. These items were slowly "found" and placed over time. The arrangement we currently have is my favorite so far and has been around for several months. It is a mixture of wedding gifts, goodwill finds, and items that hold major memories for us. 


I love owls. When I decided to start adding things to the shelves, I knew a couple of these cute feathery friends would definitely make their home there. The little brown owl was a gift from Jordan after a fishing trip from 2013, the white owl was a chipped silver mess that I cleaned up with a fresh coat of paint and the green one is a piggy bank that I snatched up at Goodwill! 


A few of the things on our shelves made their way there for lack of anywhere else to go. I love all three of these things, but wasn't sure where I could put them that would make them stand out and feel as special as they are! The bookshelves were the perfect spot. The lightbulb is actually a bottle and was given to me by a dear friend. The ceramic bird is from Goodwill and I felt that it would fit perfectly in our living room. The beer bottle is local (something that Jordan and I love) and let's face it, it's just plain cute! 


All three of these items were wedding gifts. The frame is from a family friend on my side and I cried when I received it. The hand-carved bowl is from a dear friend of Jordan's and holds our playing cards. The personalized bowl is a gift from our grandparents and every time I look at it, I smile. 

These knick-knacks, once they made their way to the bookshelves, are what finally made everything look perfect to me. 


I have also added some other things that I love to the top of the shelves: a wooden church birdhouse that is full of Christmas lights (from my mum), a globe (from my mum), a jug from a favorite beer that I thought looked cool and our growlers from locals breweries. Occasionally some flowers or plants also find their way up there too! 

--------------------------------------------------------------------------------------

Talk about using what you have and what you LOVE to make a statement! Her use of knick-knacks brings the whole shelving unit together while adding some major interest. If you can see, she also has arranged her books, not only vertically but horizontally as well. This delineation of books adds "risers" to a bookshelf and can make those knick-knacks stand out (look at that white owl on top of the purple books)! 

A BIG thank you to Margeaux for giving us a glimpse into her home and sharing her tricks on organizing and designing an awesome bookshelf! 

If you have any questions for Margeaux, please comment and we will get them to her so she can answer!!  

Do any of you have bookshelves that make you very proud? Did this post inspire you to change things up a bit at your house? Please send us pictures at rebhanrenovation@gmail.com and we will feature YOUR bookshelves/wall shelves in a follow up post! 


Monday, January 27, 2014

Let there be white!

One of our favorite features of the kitchen when we moved in was a very large octagonal white porcelain sink. Though it takes up most of the counter space in that area of the kitchen due to it's size, it makes washing dishes, etc. much easier. 

As much a we love a white kitchen and were pleased to see one when we walked into this house for the first time, we also knew there were some issues that go along with a white porcelain sink. Mainly they stain and they stain bad (they also scratch, but we haven't had too much issue with that so far!) 


Our house was a rental for years before we moved in and like most rentals, it wasn't cared for in the same manner it would have been if the owner lived in the house. There were no big problems but there were some stains and iffy things here and there. The kitchen sink was one of those areas. 


Nice, right? Fun shape, lots of space! But look at those yellow marks in the bottom of the sink. EW. I have wanted to do something about this since we moved in but kept forgetting to look up solutions. Well, I finally got so fed up that I did some research and found an easy peasy way (only two steps!) to make our sink clean again! Three cheers for a white sink! Hip, Hip, Hooray (and so on!) 


Scrubbing with the dish detergent does improve the look of the white porcelain but it still leaves much to be desired. When the sides of the sink maintain their bright-white appeal, even a partially yellowed sink bottom can be very distracting. 


The second and final step (thank God for easy fixes) required some household bleach. 


After pouring the bleach on the rags, I left them alone for about an hour. The instructions that I had read recommended 10 minutes but I got busy doing other things and didn't think it would hurt to leave it on longer. As you can see, the towels lost most of their color during the process so if you try this yourselves, remember to use rags or white towels. 
   

Look at that WHITE SINK! So much better than before and now that we know an easy way to eliminate those yellow stains, we can keep this sink looking fresh and clean for years to come! 


The change from beginning to end was remarkable and we are so happy this easy process worked so well! 

There are always ways to fix things, some harder than others but it's always worth looking into before you spend money on a bigger fix! 

Did any of you do some deep cleaning this weekend? If you have tips and tricks, please share them with us!! 


Thursday, January 23, 2014

some color inspiration

Walking into a paint store, looking online at colors or shopping at home depot (with their terrible lighting) is an overwhelming event when you are in need of paint for your home. It's so hard to think about a two to five inch square as a color that will cover your whole wall.

To alleviate any pains of paint purchasing on your part, we have put together a fairly comprehensive paint palette for any style of home. I know people who would use every color in one category and others who would mix the categories up! It's all about your personal style and what makes you LOVE your home.

Before we show you our choices, we wanted to share some advice that we learned a while back: It's easy to fall into the trap that every room in the house should be a different color - even if they look good in the scheme of "matching" - but in reality all those separate colors create some serious home A.D.D. ha! Use a color to complete two adjoining rooms (ie. kitchen and hallway) to create some serious flow for your home!

We decided to use Benjamin Moore as our source. We love the quality of Benjamin Moore paint and have known these colors to be pretty true to their swatches. Needless to say, any color from any company can change based on the individual circumstances: primer used or not used, base color, wall condition/type, etc..

We compiled six different categories for your inspiration!

 COOL BOLDS
COOL NEUTRALS
WARM BOLDS
WARM NEUTRALS
WHITES
BRIGHTS

Imagine these colors not only on walls, but trim and ceilings, as accents, back splashes, furniture and more!

What's your favorite and where would you love to use it!?

Wednesday, January 22, 2014

feeling pinspired part deux

I would love to commit to a once a week craft or Pinterest inspired project but the reality is that I won't ever live up to that commitment. Not only because sometimes time gets away from me but also because I will run out of places to put things! I think, instead, I will just create a series of posts that are "pinspired" (like this one here). This way, they will all be organized, you can see if these projects are something you would like to try yourself and I don't have to lie to you about getting a post up each week! Deal? Deal.

This week I did a project for which I have had the materials for months. I like to have somewhere to stick notes that is a little more specialized than the calendar or the fridge, where things can get lost in the shuffle. So while watching Alias (the third to last episode, OH MY!) I decided to complete this project. 

Ikea sells cork hot pads for 2.99/pk of 3 and you just can't beat that price! I decided, after seeing a similar idea on pinterest, to use these to make cork boards for our kitchen. 


This project felt free because it took me so long to use the hot pads after buying them but in reality it cost me a whopping 2.99+tax. 

I used two t-shirts from Salvation Army that I had bought for another project a year ago and they just happened to be the right colors for my current use. All the other materials were things I had on hand and waaalaaa another "free" project! 
      

I opened up the t-shirts at one of the side seams and then looked for an interesting part of the shirt. After finding what I wanted, I laid the hot pad on the shirt and roughly traced a 2 inch border circle onto the shirt. Once it was outlined, I removed the hot pad and cut out the circle. 


I used the hand staple gun, with 1/4 inch staples, to fasten the material to the pad. I placed a piece of cardboard on our coffee table just in case of any rogue staples. Because the material of the shirts was nice and stretchy, I was able to get a nice smooth edge around the circle. 

I used one shirt for one circle and the other shirt for the other two cirlces, with plenty of material left over in both shirts! 


To hang them on the wall, I used a small piece of yarn knotted at both ends and secured them with two staples. These cork boards aren't heavy at all and adding notes won't add much weight so this hanging method is plenty sturdy! 


We decided to hang them in our side entrance hallway. Because of the way the stairs turn at this entrance, we are able to see these at eye level from the kitchen but they are above our head on the landing. It's a perfect spot so we don't forget important things as we are walking out of the door! 


As you can see, we haven't done anything in this area of the house yet: yellow door, cream organizer, etc... all to be addressed at another time! 

This was a nice little project that took me about twenty minutes once all my supplies were gathered and I even got my first note! He's my "most favorite" too! 


Have any of you put your own spin on something you found on Pinterest?


Tuesday, January 21, 2014

let there be darkness?

As you might have seen in yesterday's post about our new bedroom furniture we also spent the weekend painting the walls of the bedroom. Last week we painted the ceiling and though we liked the color it was darker than we had imagined it being. It was "sitting" atop the white side walls, and the light grey ceiling look heavy and a little bit clumsy.  


Enter step two of painting and step four of our bedroom upgrade: grounding the walls with a dark color on the sidewalls.

The paint we used on the side walls was Armory by Pittsburgh Paint; again I only paid $10/gallon for this paint and ended up using less than half the gallon. We decided that the rich color, which plays off the blue in the ceiling, was a perfect color to ground the room. 

***Disclaimer: the dark carpet, whose days are numbered, should be ignored completely! We are choosing color schemes with hardwood or cork flooring in mind. 

Painting with a dark color, like we did in the hallway, is always simultaneously exciting and nerve-wracking. Because the color is such a stark contrast to its surroundings there are more chances for bleeding, uneven lines, etc.. To alleviate most of the worry, I arm myself with many painting cloths as well as my handy short handled paint brush to get the job done. Painting cloths are the best, made of old t shirts, they make the best wipes for getting into tight corners and cleaning off molding. 


During the edging process, the color was reading much more brown than we had hoped for. The color swatch, shown above, looks more like the ceiling color than the wall color but we just crossed our fingers and kept on painting. 


After the first, very splotchy coat we were left with a good feeling. Even though the color was still reading a little more brown than we had hoped, it was doing the job of grounding that ceiling and making them feel light and bright in contrast! As you can see above, we opted not to paint the "end walls." We thought adding that much darkness to the room would make it feel like a cave. 

You can also see the way the walls and the carpet are fighting one another, it's driving us crazy for the time being but we are putting our blinders on until our wallet is ready for us to change up the flooring. 


After two coats, the second with a roller, the color smoothed out and was giving us warm and cozy feelings! Even though it still reads a little more brown than we thought it would, we love the color and are happy to walk upstairs into our new and improved room. 


Above you can see where all three colors come together: white molding and end walls, Benjamin Moore Winter White ceilings, and Pittsburgh Paints Armory side walls. Doesn't it just make you smile?

Painting the bedroom: CHECK!! (phew!!!)

Here are a couple looking forward / next project peeks for the bedroom!
Left: The 15 drawers that are built into the wall of the bedroom are currently natural wood, as you can see below. I got a little over zealous and (just to see what it would look like) painted the top left drawer the same color as the walls. Eventually all the drawers need to be taken out, emptied, sanded and painted but that will be another day! 
Right: The built in cubby space that is right across from our bed (at the foot) needs reorganizing and a paint job. Currently, the center section houses my jewelry, rob's watches, etc.; really, it's just a catch all. I want to change it around so there are more shelves in the middle and make the back of the right cubby a place where I can hang my necklaces. We're not sure what color we will use for the back of these cubbies but I can only imagine it will be one of the existing colors in the room. 


Lots of things already accomplished and still more to do! For now we are enjoying our cozy space and counting down the days until the carpet "meets its maker", ha!

Until next time,
Lindsey